Have you ever thought of using your own router in your virtual lab? I did and previously I was using GNS with Cisco IOS images but with new lab I would like to use Vyatta as router and firewall. Configuration of GNS with VMware Workstation was not as easy as is Vyatta.
What is Vyatta?
Vyatta - as Wikipedia says is Debian based software-based virtual router, firewall, vpn. I find it very powerful (although I will not use more than 5% of its capabilities) and people familiar with Cisco and Juniper will feel like home. One feature which might be useful (Web GUI) was removed in version 6.3 - shame on them 😛
Ok let’s do it!
Basic Networking
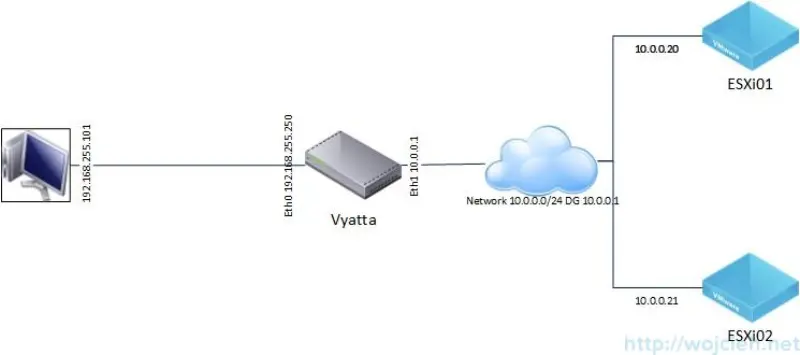
- After downloading ISO create Virtual Machine deploy VM (I used 1 vCPU, 512MB RAM and 3GB of Storage) with Debian as Operating System. I used two network adapters - one will be connected to LAN (OUTER Network, we can call it public) network 192.168.255.0 / 24 (to access Vyatta via SSH) and second one to VMNet1 which is network for Virtual Machines (INNER Network). Vyatta will do routing and firewall between networks.
- After boot screen hit enter and login to vyatta using following credentials:
- Username: vyatta
- Password: vyatta

- Next step is really simple - installation of Vyatta on local disk. In order to do that simply execute command: install system and confirm it.

- I went with default settings for partitions but you can align them as you wish.
- Set vyatta user password.
- Reboot Vyatta by executing command: reboot.
- Login again to vyatta and we will start with setting hostname. Enter configuration mode by typing configure and type set system host-name your_hostname.
- Now we will setup network interfaces:
- set interfaces ethernet eth0 address 192.168.255.250 / 24
- set interfaces ethernet eth1 address 10.0.0.1 / 24
- Commit changes by executing command commit and save changes save.
- Now when we have both interfaces up and running we will enable SSH. In order to do it execute following commands: set service ssh. Commit and save.
- Before you will be able to connect to INNER Network you need to add route on your PC or even on your physical router. In my case I added following route using command(I am running Windows) route add 10.0.0.0 mask 255.255.255.0 192.168.255.250 -p.
- Now you should be able to reach VM’s in INNER Network - in my case subnet 10.0.0.0 / 24.
- This is my current network diagram

Summary
In next posts we will configure firewall rules and iSCSI storage for ESXi hosts.