Introduction
Power outages are an unfortunate reality, and they pose a significant risk to servers and data integrity. If you’re running essential services on a Linux server and have a UPS connected to your QNAP NAS, you’re halfway to a solution! You can configure your QNAP as a Network UPS Tools (NUT) server, you can enable your Linux machine to monitor the UPS status remotely and perform an automated, graceful shutdown before the battery runs out.
This guide provides a comprehensive walkthrough of setting up your QNAP as a NUT master (server) and configuring Ubuntu Server as a NUT slave (client).
![]()
Prerequisites
Before we begin, ensure you have the following:
- A
QNAP NASrunning the QTS operating system. - An Ubuntu Server (or Desktop) installation.
- A compatible UPS (Uninterruptible Power Supply) connected via USB cable to the
QNAP NAS. - Both the QNAP NAS and the Ubuntu machine must be on the same local network.
- Basic familiarity with the Linux command line for the Ubuntu server configuration.
Configure the QNAP NAS (NUT Server)
First, we need to tell the QNAP to act as the central monitoring station for the UPS and share its status.
Connect UPS
Physically plug the UPS’s data cable (usually USB) into an available USB port on your QNAP NAS.
Access QTS
Log in to your QNAP NAS’s web administration interface (QTS).
Navigate to UPS Settings
Go to Control Panel > System > External Device > UPS.
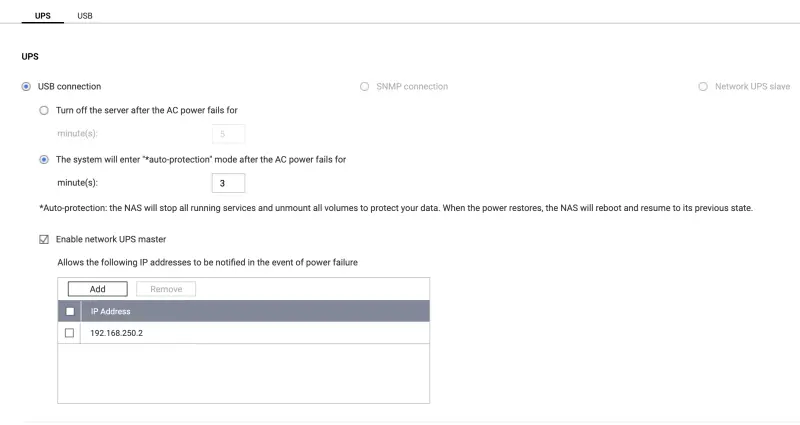
Enable Network UPS Master
In the UPS settings, check the box labeled “Enable Network UPS Master”. The QNAP should automatically detect the connected UPS model.
Note QNAP IP Address
Make a note of the IP address currently assigned to your QNAP NAS on your local network. You’ll need this for the Ubuntu client configuration.
Permit Client IP Address
This step is crucial for security. In the section labeled “Permitted IP Address” (or similar), click “Add” and enter the IP address of your Ubuntu server. This explicitly grants your Ubuntu machine permission to connect to the QNAP’s NUT server. You can add multiple client IPs if needed.
Configure Shutdown Delay
Here, you decide how long the QNAP (and subsequently, its clients) should wait after AC power fails before initiating shutdown procedures. Look for options like:
- “Turn off the server after the AC power fails for [ X ] minutes”
- “Allow the NAS to enter auto-protection mode after the power fails for [ X ] minutes”
Set your desired time [ X ]. This server-side setting is the primary control that dictates when NUT clients will be signaled to shut down.
Apply Settings
Click the “Apply” or “Save” button to activate the new UPS configuration on the QNAP.
Check upsd.users file
This file located on NAS in /etc/config/ups/upsd.users is super important as there you need to configure your user which will be used to check UPS status.
|
|
Provide your password, note it as we will use it on our Ubuntu client.
Configure the Ubuntu Server (NUT Client)
Now, let’s set up the Ubuntu machine to listen to the QNAP NUT server.
Install NUT Client Package
Open a terminal on your Ubuntu server and run the following commands to install the necessary software:
|
|
Set Client Mode
Edit the main NUT configuration file using a text editor like nano or vim:
|
|
Configure the Monitor (upsmon)
This is where you tell the client which UPS server to monitor. Edit the upsmon.conf configuration file:
|
|
Add following line matching your user from NAS upsd.users
|
|
Check the Shutdown Command
Still in /etc/nut/upsmon.conf, ensure the SHUTDOWNCMD directive points to the correct system shutdown command. The default is usually correct for Ubuntu:
|
|
This command tells the system to halt immediately (+0) once upsmon triggers it.
Restart the NUT Client Service
|
|
Verify the Setup
With both server and client configured, let’s perform some “soft” tests (no need to pull the plug yet!):
Check Client Service Status
|
|
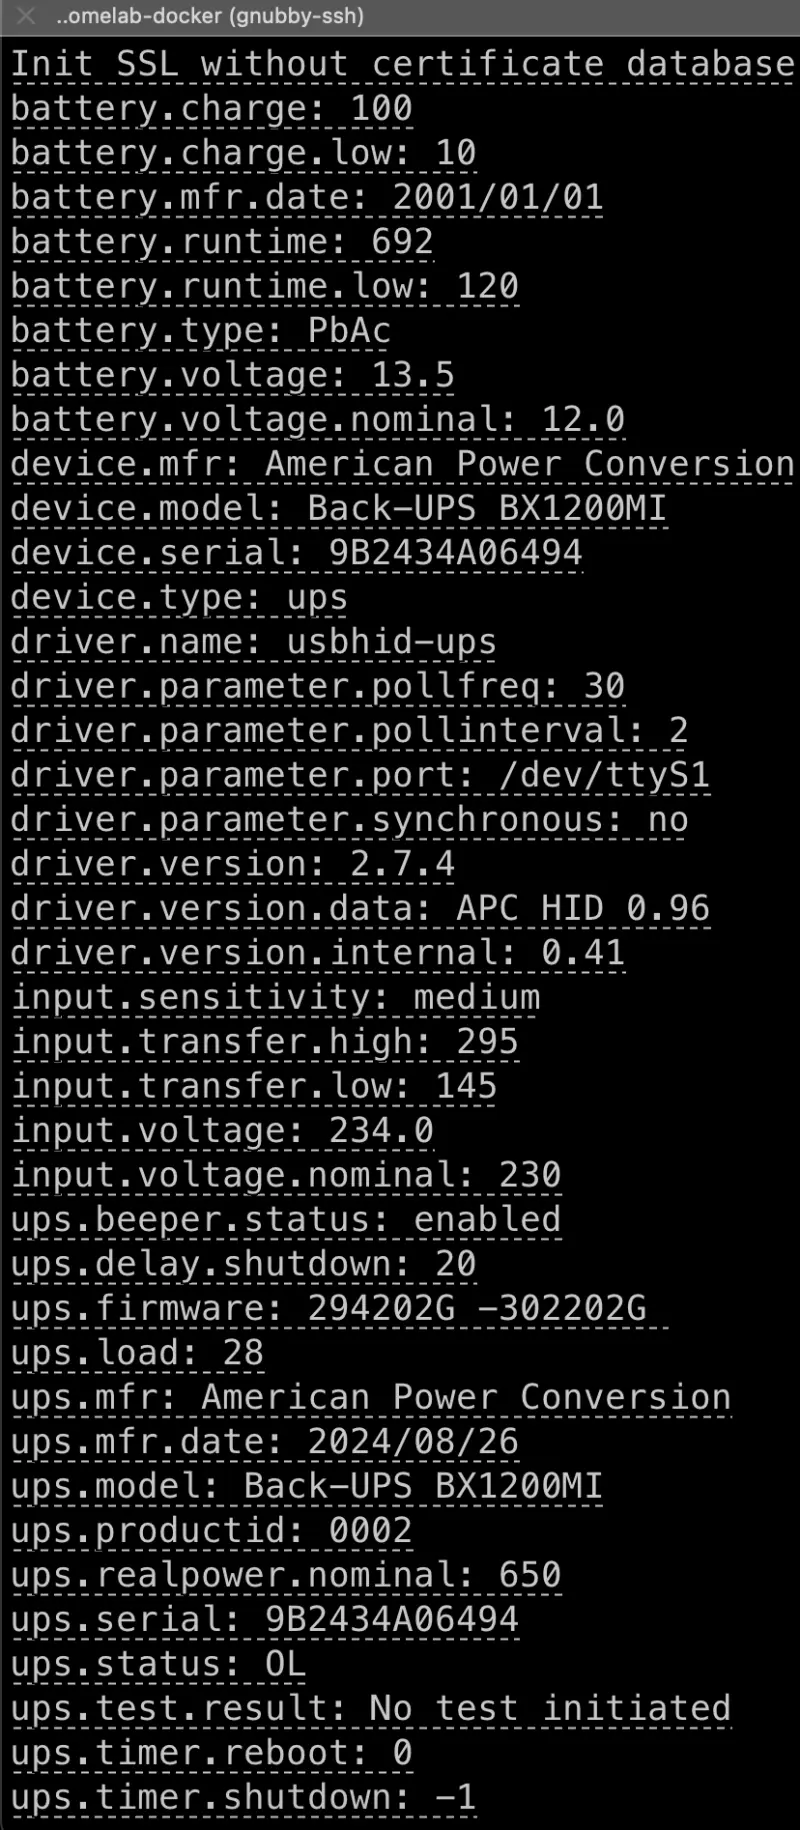
Query UPS Status (The Key Test)
|
|
Check System Logs
Check the systemd journal
|
|
Check syslog
|
|
Look for messages about successful connections or specific error details.
Understanding Shutdown Timing
A common question is: “How do I set when my Ubuntu client shuts down?” Primary Control is the Server (QNAP): As mentioned in the QNAP setup (Step 1.7), the delay configured in the QNAP’s QTS UPS settings (“Turn off server after X minutes…”) is the main timer.
How it Works: The QNAP monitors the UPS. When its configured timer expires after a power failure, its NUT server (upsd) sends a critical signal (like “Low Battery” or “Forced Shutdown”) to all connected clients.
Client Reaction: The Ubuntu client (upsmon) receives this signal and then executes its local SHUTDOWNCMD. Client-side FINALDELAY: In /etc/nut/upsmon.conf, you can set FINALDELAY 5 (or another value in seconds). This adds a small pause after upsmon decides to shut down but before running the SHUTDOWNCMD, allowing local processes a few extra seconds to terminate. This doesn’t control the main delay after power loss.
Essentially, configure the main delay on the QNAP, and the Ubuntu client will follow its lead.
Conclusion
Congratulations! By configuring your QNAP NAS as a NUT server and your Ubuntu machine as a client, you’ve created a robust system for automated, graceful shutdowns during power outages. This significantly improves the resilience of your setup and provides peace of mind knowing your data and operating systems are better protected from sudden power loss. While NUT offers more advanced configurations, this basic setup covers the most critical need for networked UPS monitoring.